 The Good:
In place upgrade lets you upgrade from XP to Windows 7 on the same machine. Easy to use, solid performance, multiple transfer options and complete migration of files, setting, folders and installed programs.
The Bad:
Nothing to note
Overview:
From the Manufacturer:
PCmover is an easy to use migration utility that will move programs, files and settings from your old computer to the new one. Simply install PCmover on both your old and new computers and go! PCmover will determine which programs, files, and settings need to be moved, and when the transfer is complete, your new computer will have the personality and functionality of your old PC as well as all of its own pre-installed software. Works with almost any Windows operating system.
Installation
You begin the installation wizard it will install the Microsoft Visual C++ 2005 redistributable package first. You need to install it on both the new and old machine. After that installation is straight forward and easy to follow through.
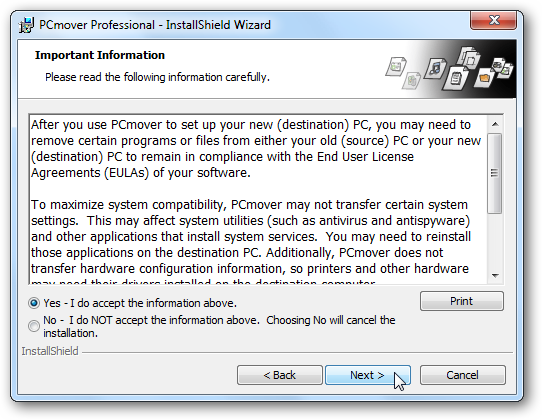 Features
After that installation is straight forward and easy to follow through.FeaturesPCmover lets you select all applications you want to move over to the new machine.
 Select files and / or folders you want moved and uncheck any you don't.
 Each time you start up PCmover you can check for updates to make sure you're running the latest version.
 Additional Features:
Windows 7 Upgrade Assistant - allows you to do an in-place upgrade from XP to Windows 7 on the same machine.
Complete Migration - Moves files, setting and programs without worrying anything is left behind.
No Overwriting - It will not overwrite any pre-installed software on the new machine.
-
Multiple Transfer Options - You can use a Laplink Ethernet Cable, external drive, or over a network including wireless.
-
Multiple User Migration - Allows you to migrate all user account on the machine.
- Allows you to migrate a PC to an Intel based Mac running Bootcamp, VMware Fusion, or Parallels.
For this tutorial we are transferring an XP machne to window 7 using an external hard drive.
PC Mover is completely wizard driven making it easy to use. As mentioned before you will need to run PC Mover on both machines and here we look at running the process on the Windows 7 machine first.

After agreeing to the Important Information above click Next and then select New computer.

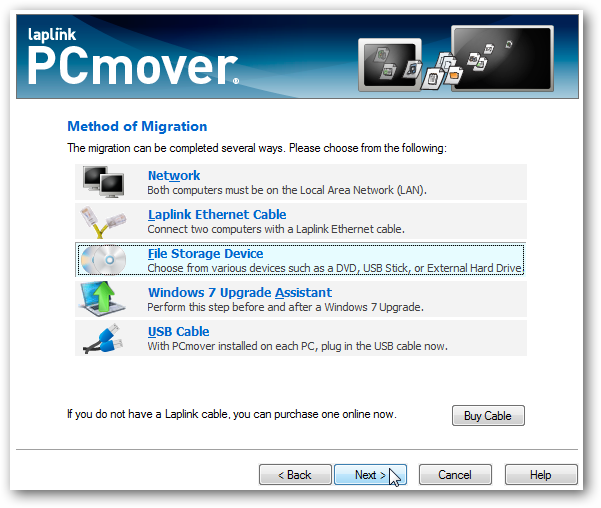
Now select the method your using for completing the migration process. For our demo we will be using and external drive but notice you can do it over a network, a LaplinkEthernet Cable, Windows 7 Upgrade Assistant, or a USB Cable.
 It uses a snapshot of the system to determine what programs and settings need to be transferred. You can skip this step, however it will result in a larger image being transferred.
 It will take a few minutes for the snapshot to complete, and times vary between systems.
 After the shot is created you will need to transfer it to the old XP machine or have it on a network where it can access it. In this scenario we are using an external drive so it's a good idea to transfer it there.
 After the process is complete you're done with the new Windows 7 machine and need to move to the old XP one.
 Now on the old XP machine connect the external drive and follow the wizard to the point where you choose the snapshot just created which was on the external drive.
 Select the migration items.
 Now you can select Migration Modifications…
 You can also customize the migration and select or deselect different apps, files and settings.
 Choose the user accounts you want to migrate.
 Select the external drive to migrate to.
 By default all of the files and folders are migrated, but you can choose to not include some. In this example we are transferring from an IBM Thinkpad and there are some drivers from that don't need to be included on the new machine. When in doubt just transfer them all over, it won't hurt anything and you can delete what you don't need later.You can decide not to include temp and backup files, which is probably a good idea if you don't want the extra stuff on your clean install.
 In the application list you can select or deselect anything you don't want to migrate. Again there are some Thinkpad proprietary apps that don't need to go to the new machine. Also, if there are old apps that you don't use anymore just get rid of them.After all of the above selections have been completed, its time to transfer them to the external drive.
 Before transferring everything you need to name what they call the Moving Van and create it on the external drive.
 The amount of time it takes will vary on different systems based on the amount of data that's being migrated.
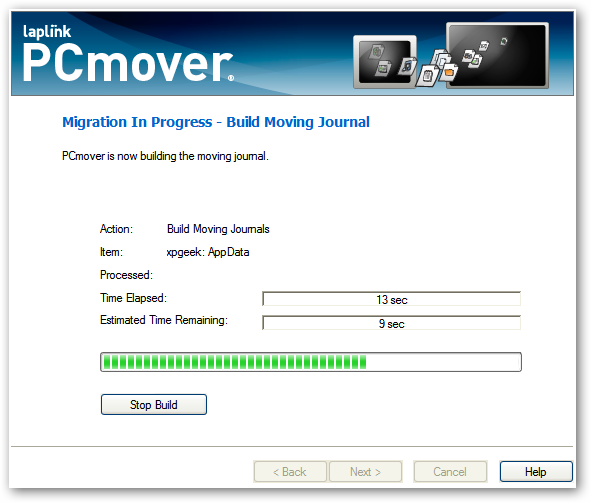 After the migration has completed you can view and save reports on what is included in the migration file.
 All of the files and settings are now on the external hard drive and it's time to take them to your new Windows 7 machine. Hook up the external drive and continue with the wizard where we left off. Browse to the moving van that was saved on the drive over on the XP machine.
 Now wait while everything is transferred to the Windows 7 machine. Again the amount of time it takes will vary between systems.
 All done! All of the files, settings, apps and folders have been moved to the new machine. Notice a Reboot is required.
It uses a snapshot of the system to determine what programs and settings need to be transferred. You can skip this step, however it will result in a larger image being transferred.It will take a few minutes for the snapshot to complete, and times vary between systems.After the shot is created you will need to transfer it to the old XP machine or have it on a network where it can access it. In this scenario we are using an external drive so it's a good idea to transfer it there.After the process is complete you're done with the new Windows 7 machine and need to move to the old XP one.Now on the old XP machine connect the external drive and follow the wizard to the point where you choose the snapshot just created which was on the external drive.Select the migration items.Now you can select Migration Modifications…You can also customize the migration and select or deselect different apps, files and settings.Choose the user accounts you want to migrate.Select the external drive to migrate to.By default all of the files and folders are migrated, but you can choose to not include some. In this example we are transferring from an IBM Thinkpad and there are some drivers from that don't need to be included on the new machine. When in doubt just transfer them all over, it won't hurt anything and you can delete what you don't need later.You can decide not to include temp and backup files, which is probably a good idea if you don't want the extra stuff on your clean install.In the application list you can select or deselect anything you don't want to migrate. Again there are some Thinkpad proprietary apps that don't need to go to the new machine. Also, if there are old apps that you don't use anymore just get rid of them.After all of the above selections have been completed, its time to transfer them to the external drive.Before transferring everything you need to name what they call the Moving Van and create it on the external drive.The amount of time it takes will vary on different systems based on the amount of data that's being migrated.After the migration has completed you can view and save reports on what is included in the migration file.All of the files and settings are now on the external hard drive and it's time to take them to your new Windows 7 machine. Hook up the external drive and continue with the wizard where we left off. Browse to the moving van that was saved on the drive over on the XP machine.Now wait while everything is transferred to the Windows 7 machine. Again the amount of time it takes will vary between systems.All done! All of the files, settings, apps and folders have been moved to the new machine. Notice a Reboot is required.
After the restart is launches Start Up This which disables programs that would auto start on the old machine. You can go through the list and re-enable them if you want.

We transferred settings from an older IBM Thinkpad G40 to an Acer Aspire with a dual-core AMD processor and 4GB of RAM and everything went very smooth and quickly. Everything that was chosen to be transferred did so with no errors or problems. While backing up the files and settings on the XP machine it does take up a good amount of resources so you might want to close out of everything first and just run PC Mover.

Product Suppor
The included user manual is very easy to read and follow and the wizard driven interface explains each step remarkably well, however you may need technical assistance. They have great product support on their website in the form of FAQ, Knowledgebase, phone support, Online Chat, and web form incident tickets. They also allow you to create your own personal account on the site for keeping track of your support requests.

Conclusion
If you're worried about losing data, programs and settings when you migrate to Windows XP, PC Mover does and excellent job and will quickly ease those worries. It is nicely laid out and easy to use as it is completely Wizard driven. There are no complicated menus or settings and everything we transferred worked perfectly. It offers several means to move your PC from external drives, direct cables, over a network and more. What really makes this a top notch application is the Windows 7 Upgrade Assistant that allows an in-place upgrade from XP to Windows 7 on the same machine. Now that a lot of users will be migrating from XP to Windows 7 and there's no direct upgrade option, PC mover might be exactly what you need. The professional version we covered here is $59.95 but you can also get the cheaper Home edition for $39.95 or the one-time user upgrade to Windows 7 for $19.95.

Rating
- Installation: 8
- Ease of Use: 9
- Features: 8
- Performance: 9
- Product Support: 8
0 comments:
Post a Comment